Forward your phone number on major US carrier is a convenient way to redirect your calls to another number when you’re unable to answer or when you want to ensure you don’t miss important calls. Here’s how you can set up call forwarding on major US carriers:
Verizon Wireless:
- Dial *72 on your Verizon phone.
- Enter the phone number you want your all calls forwarded.
- Press the Call button.
- To confirm call forwarding, wait for a confirmation tone or message, then hang up.
- To deactivate call forwarding, dial *73 and press the Call button.
AT&T:
- Dial **21*PhoneNumber# on your AT&T phone to activate call forwarding.
- Replace “PhoneNumber” with the number where you want to forward your calls.
- Press the Call button.
- To deactivate call forwarding, dial ##21# and press the Call button.
T-Mobile:
- Dial **21*PhoneNumber# on your T-Mobile phone to activate call forwarding.
- Replace “PhoneNumber” with the number where you want to forward your calls.
- Press the Call button.
- To deactivate call forwarding, dial ##21# and press the Call button.
Sprint (now part of T-Mobile):
- Dial *72 on your Sprint phone.
- Enter the phone number to allow you want your calls forwarded.
- Press the Call button.
- To deactivate call forwarding, dial *720 and press the Call button.
US Cellular:
- Dial *72 on your US Cellular phone.
- Enter the number to which you want your calls forwarded.
- Press the Call button.
- To deactivate call forwarding, dial *73 and press the Call button.
How to set up call forwarding on Google Fi
Google Fi supports call forwarding, allowing you to redirect your calls to another number. To set up call forwarding on Google Fi, follow these steps:
Open the Google Fi App:
- Open the Google Fi app on Android device. Make sure you’re signed in to your Google Fi account.
Access Settings:

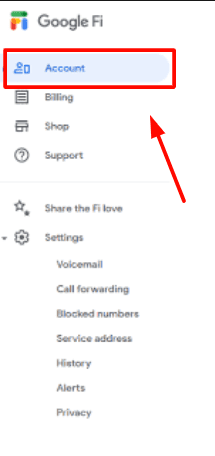
- Tap on the “Account” tab at the bottom right corner of the app to access your account settings.
Call forwarding settings:
- In the Account tab, scroll down to find “Phone settings” or “Call forwarding.”
Enable Call Forwarding:
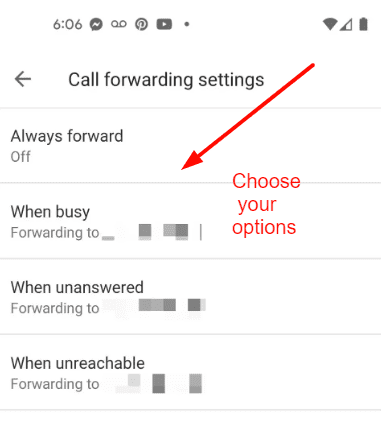
- Tap on “Call forwarding” or a similar option. You will see various call forwarding options, such as “Forward when busy,” “Forward when unanswered,” and “Forward when unreachable.”
Select an Option:
- Choose the call forwarding option you want to activate.
Enter the Forwarding Number:

- You will Enter the phone number to which you want your calls forwarded. Type in the complete phone number, including the area code.
Save or Enable:

- After entering the forwarding number, tap “Save” or “Enable,” depending on the wording in the app.
Confirm Activation:
- You may need to confirm your choice or acknowledge that you want to enable call forwarding. Follow the on-screen prompts.
Deactivate Call Forwarding (Optional):
- To deactivate call forwarding, return to the call forwarding settings in the Google Fi app and select the corresponding option. You can turn off call forwarding or modify the forwarding number as needed.
Google Fi provides several call forwarding options, including forwarding to voicemail, another number, or Hangouts. Ensure that you select the correct option based on your preferences. Also, be aware of any potential charges associated with forwarding calls to non-US numbers or international destinations, as Google Fi may apply standard rates for such calls.
Forwarding calls to another number may result in additional charges, depending on your carrier and your plan. So check with your carrier for any specific requirements or fees associated with call forwarding. Additionally, some carriers may offer options for conditional call forwarding (e.g., forwarding calls only when busy or unanswered), so you can customize how your calls are forwarded.
How to make a call forwarding on Android phone
Call forwarding on Android phones allows you to redirect incoming calls to another number, such as another phone number or voicemail. The exact steps for setting up call forwarding may vary slightly depending on your Android device and the version of Android it’s running, but the general process is as follows:
Open the Phone App:
- Open the Phone app on your Android device. This app may have different names or icons depending on the device manufacturer (e.g., Phone, Dialer, Contacts).
Access Settings:
- In the Phone app, look for the three-dot menu icon (usually in the top-right corner of the screen) or a similar settings icon and tap on it.
Access Call Settings:

- In the settings menu, locate and tap on “Call settings,” “Call forwarding,” or a similar option.
Select Call Forwarding Type:

- You’ll see several call forwarding options. Here are some common types:
- Always Forward: Redirect all incoming calls.
- Forward When Busy: Redirect calls when your phone is in use.
- Forward When Unanswered: Redirect calls when you don’t answer within a certain number of rings.
- Forward When Unreachable: Redirect calls when your phone is out of the network coverage area or turned off.
Choose a Forwarding Number:

- Select the type of call forwarding (e.g., “Always Forward “). You will be prompted to enter the forwarding number where you want to redirect your calls. Enter the complete phone number with the area code.
Save or Enable:
- After entering the forwarding number, tap “Save,” “Turn On,” or a similar option to activate call forwarding. Click confirm choose a choice.
Verify Call Forwarding:
- To ensure that call forwarding is active, make a test call to your Android phone from another phone.
Deactivate Call Forwarding:
- To deactivate call forwarding, return to the call forwarding settings in the Phone app and select the corresponding option (e.g., “Turn off,” “Disable“). This will stop call forwarding for the selected type.
The exact steps and terminology may vary depending on your Android device’s manufacturer and the version of Android it’s running. If you’re unable to find the call forwarding settings in the Phone app, you can also search for “call forwarding” in your device’s settings menu to locate the relevant options.
